Opening and Adjusting DSLR ImagesAIP4Win 2.2.0 and higherby Richard Berry |
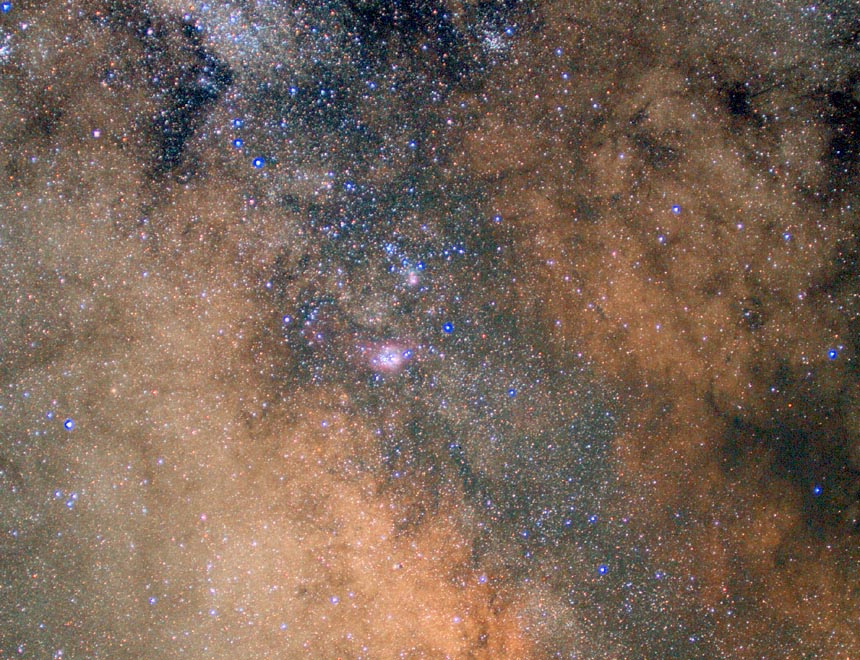
In this tutorial, I'll show you how to open and process DSLR images using a picture of the Sagittarius region of the Milky Way that I made last summer. It was taken from Pine Mountain Observatory in eastern Oregon, at an elevation of 6,500 feet. To download a Zip archive containing this image, click Sgr_0473.zip (11MB). The image was a 6-minute exposure taken with a Canon Digital Rebel XT (EOS 350D) using a 50mm f/2.8 macro lens. |
Check the DSLR Conversion SettingsBefore you try to open a DSLR image, check the DSLR conversion settings. Do the following:
The DSLR Conversion Settings window will open. Select a De-Bayerization algorithm. We prefer VNG for astronomical images, but some people like AHD. You can experiment. Select the "Use camera white balance" option. This usually produces an image that is reasonably close to an acceptable color balance. We recommend using the "Daylight" color balance setting on your DSLR camera. If this setting produces weird results with your camera's images, use the "Auto white balance and stretch" option instead. Finally, click "Save" and close the window. |
What Happens when you Open a DSLR Image?Digital SLRs capture color by covering the image sensor with an array of tiny color filters called a Bayer array. Most Bayer arrays consist of interspaced red, green, and blue filters. When you save an image using the camera's "raw" option, the image is saved the same way the image sensor captured it.
To reconstruct a color image, the camera (or a computer) has to interpolate at every pixel location to find the value of the other two primary colors. For example, to find the color of a green-filtered pixel, the software has to take the average of adjacent red pixels to get red, and take the average of nearby blue pixels to get blue. VNG and AHD are different interpolation schemes. |
 Even when you save a picture in
"raw" format, most DSLRs let you save it as a
JPEG image at the same time. Even when you save a picture in
"raw" format, most DSLRs let you save it as a
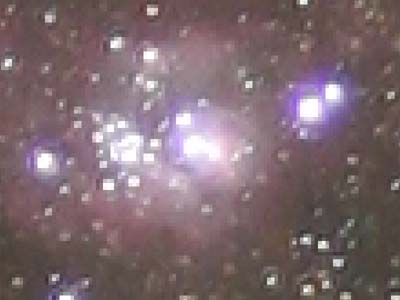
JPEG image at the same time.To the left, you see the Canon's JPEG image. Because the camera has to interpolate pixels, the resulting picture is somewhat fuzzy. To offset this fuzziness, Canon applies an unsharp mask -- but you can see that it has produced dark rings around the brighter stars. With AIP4Win, our goal is to produce an image with better color and sharpness than your camera can on its own. |
Getting Started: Open the ImageTo open a DSLR image, select File > Open from AIP4Win's main menu:
Click the "Open" button. The image will be loaded into your computer's memory and displayed. Don't be surprised when the image appears very dark. With this particular image at full size, you can see a sprinkling of stars and perhaps a hint of the starclouds. In the tiny screen shot, you can barely see them. This happens because when AIP4Win opens a raw image, it always shows the whole range of pixel values in the image. On the Image Display Control, notice that the Black setting is 0.0 and the White setting is 4095.0. Those are the minimum and the maximum values that a 12-bit raw image can have. |
| Display
a Histogram of the Image To display a histogram, select Measure > Histogram from AIP4Win's main menu. The Histogram window will open and you will see a display like the one shown below. The histogram is a graph that plot pixel values on the X-axis (horizontal) versus how many pixels have that pixel value on the Y-axis (vertical). Look along the bottom of the X-axis. You will see a label at the left end that says Min=0.0, and a label at the right end that says Max=4095.0.
In other words, all pixels have values between 0.0 and 4095.0. As you move the mouse cursor, the bottom three lines change. The PV= line tells you the pixel value under the mouse cursor. The Pixels= line tells you how many pixel in the image have that value, and the Percentile= line tells you the percentage of pixels with a value less than the pixel value under the mouse cursor. If you place the mouse cursor on the large peak, you will see that the peak occurs at PV=462 with Pixels=142,000, and that Percentile=38%, meaning 38% of the pixels in the image have a value less than 462. No wonder the picture looks dark! 462 is only about one-tenth of the way between black (=0) and white (=4095). As you scan your mouse cursor across the histogram, you'll notice the number of pixels falls rapidly from the peak at 142,000 to only 10 or 15 pixels. The high-value pixels are from the images of stars; the low-value pixels are in the sky background. This histogram is typical of histograms of astronomical images. There's usually a lot of very dark sky background, there may be some nebula or galaxy light in the middle range of pixel values, and there's a thin sprinkling of high-value pixels in the images of stars. The Histogram Tool showed you how pixel values are distributed in this image. You don't need this tool any further now, so put it away by clicking its Close button. |
| Click "Auto" on the
Image Display Control The Image Display Control at the left side of the screen determines how an image looks on the screen. It never changes anything in the image, so you can play with these controls all you want and you'll never "ruin" a picture with it. You can make the image look bad (or good), but you won't actually change it.
Find the Auto button on the Image Display Control and click it. When you do this, AIP4Win examines the histogram. By default, it finds the pixel value at the 1% percentile (0.01) and sets Black to this value, and it finds the pixel value at the 99% percentile (0.99) and sets White to this value. If you have not changed the default values, AIP4Win will make Black=392 and White=1178. The appearance of the image will change dramatically! You can now see the star clouds of the Milky Way glowing. There are lots of stars, and the Lagoon and Trifid nebulae shine brightly. Experiment with different ways to display the image. Just under the Black and White values are a pair of buttons. If you click these, AIP4Win changes the values of Black and White up or down. You can also select the Black or White text box, type a number, and the press enter to change them. The green shape is a small histogram, and it changes as you change Black and White. The "B" and "C" buttons change the Brightness and Contrast of the image, and the Change slider sets how much change each click in Black, White, Brightness, or Contrast makes. One word of caution: Each time you click a button, AIP4Win recomputes the entire 8 megapixel image! If you click too many times in too little time, your computer's processor and memory will get overloaded. With an old, slow computer, it might take several minutes to catch up with a wild frenzy of clicking. Depending on the size of your computer's monitor, you might not be able to see all of this image. Locate the Zoom controls near the bottom of the Image Display Control. If you click the left button, the image display gets smaller; if you click the right button, the image display gets larger.
The default size is 100%. At that size, you'll see about one-third of the height and width of this image. The largest Zoom is 1600%. At that size, individual pixels appear as large blocks on the screen. You can scroll across this huge image using the scrollbars that appear automatically at the right and bottom of the image. With the Zoom at 100% of larger, check to see that the entire image is in sharp focus, with nice round stars. You will probably notice that bright stars suffer from "blue bloat," and the centers of the Lagoon and Trifid are "blown out" to pure white. Blue bloat is common with reasonably priced lens for DSLRs; only very expensive apochromatic lenses focus violet and deep blue light sufficiently well to avoid blue bloat. |
| Optional:
Tame Excessive Contrast with Sigmoid Brightnesss Scaling As you examined this image, you might have noticed that it has a plenty of contrast. Contrast is good in moderate doses, but too much contrast means the tone range goes too rapidly from black to white. With this image, it is difficult to see the subtle modulations in the dusty areas of sky without blowing out the bright star clouds and nebulae. And if you preserve detail in the nebulae, the background can go inky black with the loss of the Milky Way's dust structure.
Click to read about Sigmoid Brightness Scaling. You will get a pretty good result is you simply use the default values in the Brightness Scaling Tool. Min will be 93, Max will be 4095, and the scaling parameter will be 723. Click to create the new sigmoid-scaled image. After this scaling, your screen should look something like the screen grab at left. The original image is on the right, and the sigmoid-scaled image is on the left. At first you might be rather dubious at how "soft" the sigmoid-scaled version appears, but if you click the "Auto" button on the Image Display control, you'll see that the scaled version has plenty of potential for contrast, but if you want, you can see the dark tones and light tones at the same time. Details in the dark dust clouds are visible, and so are details in the Lagoon and Trifid nebulas. Before continuing, it's a good idea to save the new image. From AIP4Win's main menu, select File > Save as FITS. Choose a name that describes the image, such as "Sgr_0473_sigmoidscaled.fts". Select the "32-bit floating point" option so that no information is lost when you save the image. (Note: To appreciate how much information is stored in a large color image -- and how much data AIP4Win is working with -- check the size of the new FITS file: it is 94 megabytes!) You may also want to close the original image since it takes a lot of memory, and you won't be using it again. Brightness scaling is optional. It happens to work well with this image, but it might not be particularly effective with other images. If you want to skip this step, you can always open the image again and try a different approach later on. |
| Start
the Color Image Tool The Color Image Tool is designed to adjust the brightness and color of color images. To open this tool, select Color > Color Image Tool from AIP4Win's main menu. Click on the Source Image tab.
If you have only one images open, the tool automatically selects it as the source image, that is, the image you're going to work on. If you have several images open, click on the one you want to process, then click the long skinny button labeled "Select Current Image -> Source Image." The image is 3474 pixels wide by 2314 pixels high, and the image data has a bit depth of 16 bits. If you had selected the raw image instead, the bit depth would be 0 to 4095, that is, a 12-bit image. At the bottom of the tool is the big button that creates and refreshes your new color image. Just to its right is the word "Ready." That tells you the current status of the tool; it's waiting for input from you! Go ahead and click on the big Create New Color Image button. Depending on how fast your computer is, in a few seconds a new window that is all black will appear, then you'll see several status messages speed by, and finally your new image will appear. Because you have not made any changes, the new image will look exactly like the original image. Notice that the caption on the big button has changed: it now reads Refresh Current Color Image. After you change some settings, you can click on the big button again, and the image will be refreshed using your process settings. Each time you change the settings, you can refresh the image. You can refresh the image as many times as you like, so you're free to experiment and play with settings to your heart's content! Another more subtle change occurred: When the big button changed to "Refresh," a button called New Image appeared under the "Ready" status. If you like the result of some settings and want to preserve it, you can create another new image by clicking the New Image button. |
| Select
the Levels Tab The Levels tab shows you histograms for the Luminance, Red, Green, and Blue color channels of your image. AIP4Win works in a color space called LCr, that is, Luminance/Chrominance, or brightness and color. With the Color Image Tool, you can change the image brightness without changing its color, and vice versa.
On each histogram, you should see a black slider bar and a white slider bar. The black slider will be at the left edge; the white slider starts at the right edge of the histogram. Use your mouse cursor to drag each of the sliders. (Dragging means that you hold the left mouse button down while you move the mouse.) The slider will move with the mouse cursor. As you drag the black slider, you'll see a pair of numbers at the lower left of the histogram change. The upper number is the pixel value on the histogram; the lower number is the decimal fraction of pixels with values below the black bar's pixel value. As you drag the white slider, you'll see a pair of numbers at the lower right of the histogram change. The upper number is the pixel value on the histogram; the lower number is the decimal fraction of pixels with values below the white bar's pixel value. If you drag one of the sliders too rapidly, it might "come unstuck" from the mouse cursor. Simply go back and grab it again. As you drag, your computer has to update the display, and slower computers can't always keep up with your mouse motion. Now -- notice the Auto button under the histogram. This button moves the Black and White sliders on the Luminance, Red, Green, and Blue histograms to points on those histograms that usually produce good-looking images. The default settings are 0.01 (1% percentile) for the Black slider and 0.995 (99.5% percentile) for the White slider. You can change the Auto settings on the Adjusters tab. |
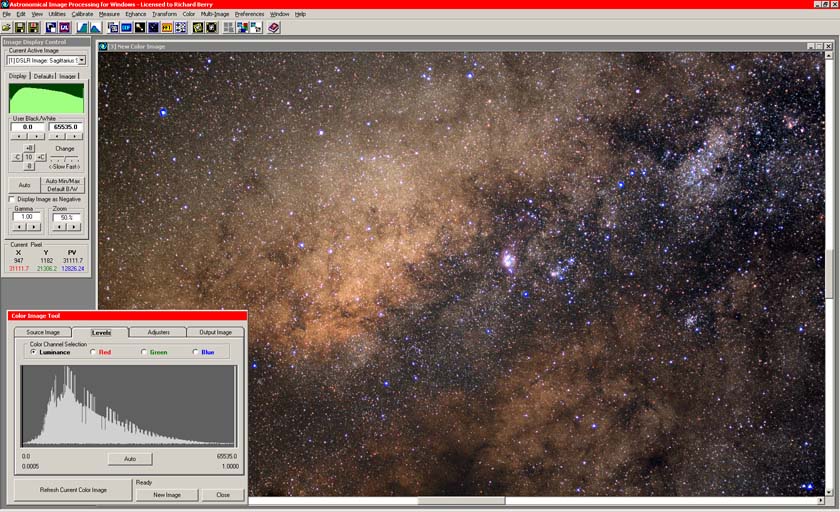 |
| The screen shot above
shows what you'll get if you click the Auto
button with the default settings, and then click the big Create New Color Image
button. With the
Zoom set to 50%, more of the image is visible. If you feel like experimenting more, go ahead. The Color Image Tool never changes the original image; only the new image is changed. |
| Select
the Adjusters Tab The Adjusters tab gives you control over four key settings:
(Please note: The values shown in the Level Settings frame are "for your information only" -- they are not controls. The top pair of values are the Black and White pixel values of the Luminance component; the next three pairs show the the Black and White pixel values for the Red, Green, and Blue color channels. These are the same values you see on the bottom left and right of the histograms on the Levels tab.)
A color saturation of 1.00 gives you natural color strength. Depending on your personal preferences, the color produced may be too strong or too weak. Values from 1.00 to 2.00 are more saturated than natural color. Depending on the image, results vary from dramatic to downright ugly. Luminance Gamma affects the brightness of the middle tones in the image. The darkest tones and the lightest tones are not changed. Values below 1.00 give you "darker than normal" middle tones; values greater than 1.00 give you "brighter than normal" middle tones. Astronomical images often look best with values between 1.20 and 1.60, but this depends on how your computer's monitor is set up, how much ambient light is falling on your computer's monitor, and your personal preferences. Finally, the Auto Black-Point and Auto White-Point settings determine what the Auto button on the Levels tab does. The default values are 0.01 (that is, 1%) and 0.995 (99.5%). For this image, the setting was changed to 0.999 to preserve color and detail in bright objects like the Lagoon and Trifid. You can type in numerical values, or you can click the down and up buttons to raise and lower the values. Since the default values work well for most astronomical images, you probably won't find it necessary to change the black-point and white-point values. |
| Select
the Output Image Tab We conclude our tour of the Color Image Tool with the Output Image tab. Controls on this tab let you give a name to the new image your are creating, and also set the range of numerical values in the new image.
The choice of Output Range depends on what you want to do with the image. -- 0 to 255 (24-bit Color) is fine for images that you will save in JPEG, TIFF, or other popular color image format. If you think in terms of 8-bit grayscale values, you can use this option. -- 0 to 4095 ("raw" Color) is an option for the rare user who thinks in 12-bit grayscale values. -- 0 to 65535 (48-bit Color) is the best option if you intend to save the image for possible further work in the FITS format, or if you plan to export it as a 16-bit TIFF image for further processing in software that recognizes this format, such as PhotoShop. This completes your tour of the Color Image Tool. You have seen the controls and where the controls are located on the tool. Most of the time, you will alternate between the Layers tab to set and adjust color, and the Adjusters tab to tune saturation and middle-tone brightness. Time for some image processing.... |
| Exercise
your Creativity... Now it's up to you! As a general rule, the Color Image Tool's default settings will give you an "acceptable" result. Chances are that you can do better. How? Here are some thoughts to keep in mind:
|
| Some Results: |
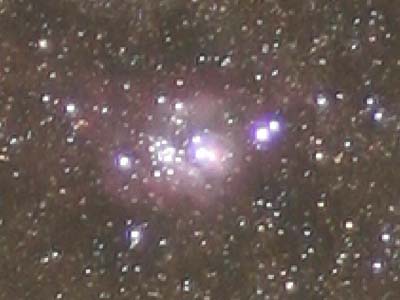  |
| Here is a comparison between a highly enlarged section of the Canon 350D's JPEG, and the Canon raw image processed in AIP4Win. The differences are subtle but real. The Canon JPEG image shows less nebular detail, displays weaker color (especially in star images), and reveals sharpening artifacts as little dark rings around each star image. The AIP4Win-processed raw image shows more faint stars, has richer star colors, and shows more extensive nebulosity. |
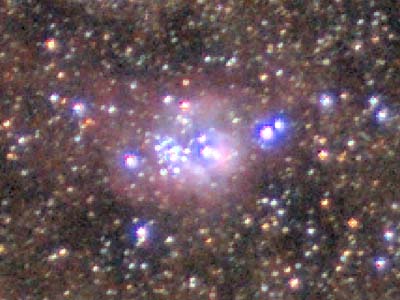
 Here is a larger section from the middle
of the image. The great starcloud of Sagittarius |
Copyright © 2008 by Richard Berry |
Return to Richard Berry's Home Page |
 Digital single-lens-reflex cameras
make astronomical imaging fun and easy to get into.
Although not as sensitive as the more expensive cooled
astronomical CCD cameras, their direct-to-color imaging
route has widespread appeal.
Digital single-lens-reflex cameras
make astronomical imaging fun and easy to get into.
Although not as sensitive as the more expensive cooled
astronomical CCD cameras, their direct-to-color imaging
route has widespread appeal.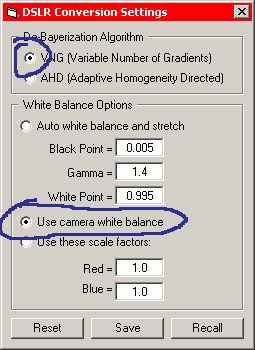 From AIP4Win's main menu, select Preference > DSLR
Conversion Settings
From AIP4Win's main menu, select Preference > DSLR
Conversion Settings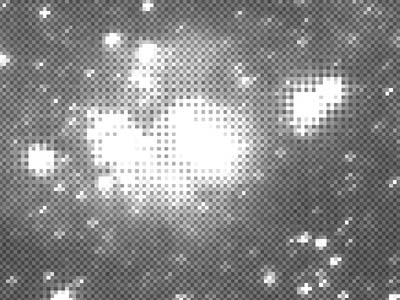 To the left, you can see an enlargement of
a small region around the Lagoon Nebula has a
checkerboard appearance. Each pixel records only one of
the three primary colors: red, green, or blue.
To the left, you can see an enlargement of
a small region around the Lagoon Nebula has a
checkerboard appearance. Each pixel records only one of
the three primary colors: red, green, or blue.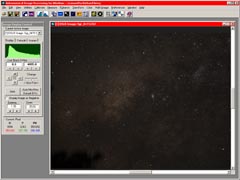 Select
the file you wish to open. For this example, the filename
is "Sgr_0473.CR2."
Select
the file you wish to open. For this example, the filename
is "Sgr_0473.CR2."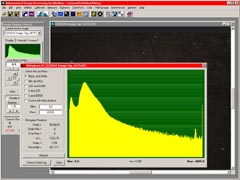 Run your
mouse cursor over the image. You will see changing
numbers in the "Histogram Readout" frame at the
lower left. It tells you that the image has 8,038,835
pixels in it, and that there are no pixels with values
less than the minimum of 0.0, and no pixels with values
greater than the maximum of 4095.0.
Run your
mouse cursor over the image. You will see changing
numbers in the "Histogram Readout" frame at the
lower left. It tells you that the image has 8,038,835
pixels in it, and that there are no pixels with values
less than the minimum of 0.0, and no pixels with values
greater than the maximum of 4095.0.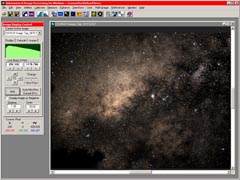 When you opened this image, AIP4Win
automatically set the display so that Black was 0.0 and
White was 4095.0 - the minimum and maximum pixel values
possible in a EOS 350D image. You can change these values
manually or you can let AIP4Win do it for you.
When you opened this image, AIP4Win
automatically set the display so that Black was 0.0 and
White was 4095.0 - the minimum and maximum pixel values
possible in a EOS 350D image. You can change these values
manually or you can let AIP4Win do it for you.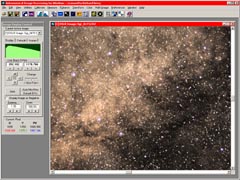 The smallest zoom is 10%. At that size,
even a large DSLR image will fit on the screen of a small
laptop computer.
The smallest zoom is 10%. At that size,
even a large DSLR image will fit on the screen of a small
laptop computer.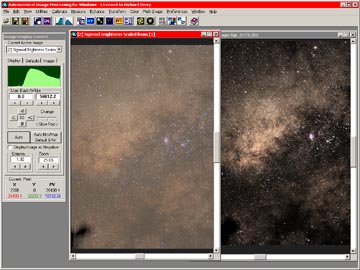 One way to preserve both dark and light
parts of the image is to apply Sigmoid Brightness Scaling
to the luminance component of the image. This reduces the
contrast and give you enough "headroom" to
optimize both the dark and bright features captured in
this image.
One way to preserve both dark and light
parts of the image is to apply Sigmoid Brightness Scaling
to the luminance component of the image. This reduces the
contrast and give you enough "headroom" to
optimize both the dark and bright features captured in
this image.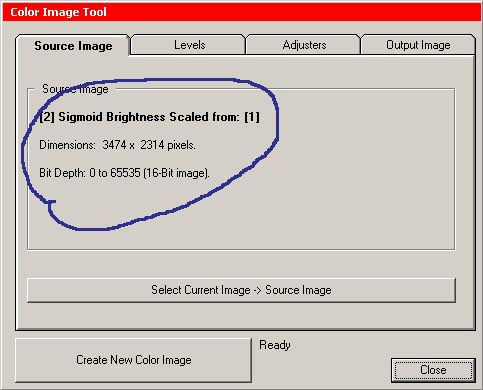 This tab identifies the image you're
working on and gives you some information about it.
This tab identifies the image you're
working on and gives you some information about it.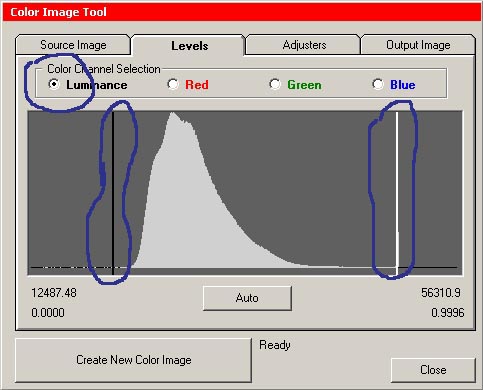 Select each of the radio buttons to view
the histogram of each color channel. The histograms are
color coded, that is, the red histogram is red, green is
green, and so on.
Select each of the radio buttons to view
the histogram of each color channel. The histograms are
color coded, that is, the red histogram is red, green is
green, and so on.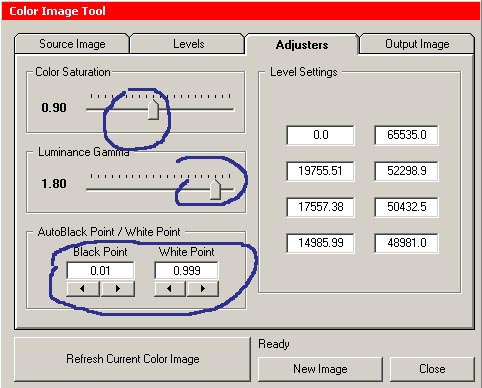 The Color Saturation
slider gives you control over the strength of the color.
All the way left, the saturation is 0.00, and the new
image becomes grayscale -- no color at all.
The Color Saturation
slider gives you control over the strength of the color.
All the way left, the saturation is 0.00, and the new
image becomes grayscale -- no color at all.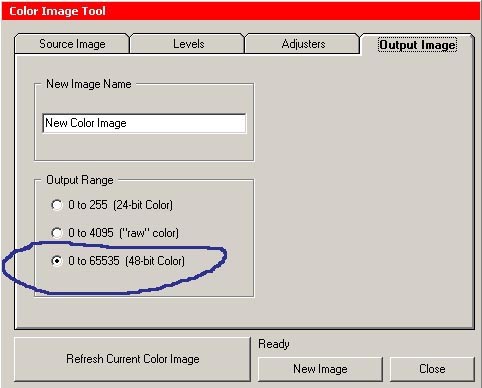 The default
name is "New Color Image." If you make several
different variations, giving them different names should
help you keep them straight.
The default
name is "New Color Image." If you make several
different variations, giving them different names should
help you keep them straight.