Sigmoid Brightness ScalingAIP4Win 2.1.8 and higherby Richard Berry |
Sigmoid brightness scaling is a powerful enhancement function that allows you to see the full range of image data in those hard-to-display images, from faint field galaxies normally lost in the blackness of the sky background to the blown-out central cores of the giant elliptical galaxies. Plus it is fantastic tool for displaying the full extent of the hydrogen-alpha nebulae. The technique is called "sigmoid" scaling after the S-shaped transfer curve when output values are plotted against the logarithm of the input values. |
Open the ImageTo open an image, do the following:
To download a Zip archive containing this image, click markarianstack.zip. |
| Set the Black/White Display
Parameters
Ideally, you would like to be able view faint galaxies scattered over the sky background while simultaneously seeing the cores of the brightest galaxies. If an image has a long dynamic range (like this example), you will probably find it difficult (or impossible) to display the image properly. If you select a sufficiently low Black value to show the background, the cores of the bright galaxies are blown out; if you set the White value high enough to see the cores, the sky appears jet black. Sigmoid Brightness Scaling is designed to chnage the pixel value in the image so that you can see the faintest features and the brightest features simultaneously. |
Invoke the Brightness Scaling ToolThe next step is to start the Brightness Scaling Tool.
|
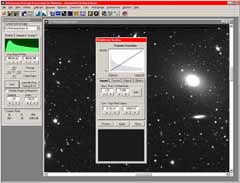 The Transfer Function graph shows a
histogram of the image (in gray) and a transfer function
graph (as a blue line). The Transfer Function graph shows a
histogram of the image (in gray) and a transfer function
graph (as a blue line).The Preview box provides a preview version of the new image you will create. Over time you will acquire a feel for how the tiny preview image relates to the image you wish to create. |
Set the Range of Input Values to 0.0 and 1.0
The Black Point / White Point panel displays two decimal fractions. The value of the Black Point shown above is 0.01, meaning that 1% of the pixels in the image will appear black in the output image. For an image with a long dynamic range, this is not desireable. You want to set this value to zero so that no pixels are set to jet black. The value of the White Point shown above is 0.999, meaning that 99.9% of the pixels in the image will appear gray and 0.1% will be blown out white in the output image. For an image with a long dynamic range, this is not desireable. You want to set this value to 1.0 so that no pixels will be blown-out white. To change these settings, take the following steps: 1. In the Black Point / White Point panel, click repeatedly on the leftmost arrow button. 2. When the Black Point reaches 0.0, further clicking will not change the value. 3. In the Black Point / White Point panel, click repeatedly on the rightmost arrow button. 4. When the White Point reaches 1.0, further clicking will not change its value. 5. Click the Auto button. Note that the values shown in the Low / High Pixel Values panel have changed. These are the actual pixel values corresponding to the Black Point and White Point values. The histogram in the Transfer Function graph changed, too, reflecting the wider range of values that you will use to create the new enhanced image. |
Select the Sigmoid Transfer Function
To select the transfer function, take the following steps: 1. Select the Transfer tab. 2. In the Scaling Type panel, select the Sigmoid radio button. Two things will happen:
If the image in the Preview window is still too dark, you need to lower the value of the 50% point: 1. In the Scaling Parameter panel, click left up-down button. 2. The value of the 50% will decrease. 3. The Preview image will become brighter. 4. Continue clicking the left button until the image looks right. If the image in the Preview window become too light, you need to raise the value of the 50% point. Alternatively, you can enter a numerical value into the 50% point text box. Note that the sky in the Preview window should NOT jet black. To preserve sky details, it should appear as a dark shade of gray. You can darken the sky later if you want to. At this stage, however, it is best to retain information in the sky background. |
Set the Range of Output Values to 0 and 65535
To set the output range for the new enhanced image, do the following: 1. Select the Outputs tab. 2. Many users are happy with the default values:
If you want different low and high output values, enter them in the text boxes. If you want to retain output values outside the low/high values, uncheck the Clip Output Values check box. If you want a negative image (i.e., white sky, black stars) check the Invert Output Image checkbox. |
Set Options to "Output Range Lo/Hi"
To set display options for the new enhanced image, do the following: 1. Select the Options tab. 2. In the Preview Display Stretch panel, select the Output Range Lo/Hi radio button. |
Apply Sigmoid Brightness Scaling
1. Click the Apply button. 2. AIP4Win will create the new enhanced image. 3. The Brightness Scaling Tool will close. The Image Display Control is set to the Output Low/High values you chose. |
What Sigmoid Scaling Does
The "before" image is displayed so that the sky is just bright enough to show faint background galaxies. The central regions and cores of the large galaxies are burned out white. In the unaltered "after" image, the sky is darkish gray and the centers and cores of the bright galaxies are seen. The image now more closely approximates the feeling of visual observation. It appears more subtle, more nuanced, and noise is less intrusive. |
Save the Enhanced Image AIP4Win offers several options for saving images:
To save each color channel image as a 32-bit FITS image, do the following:
|
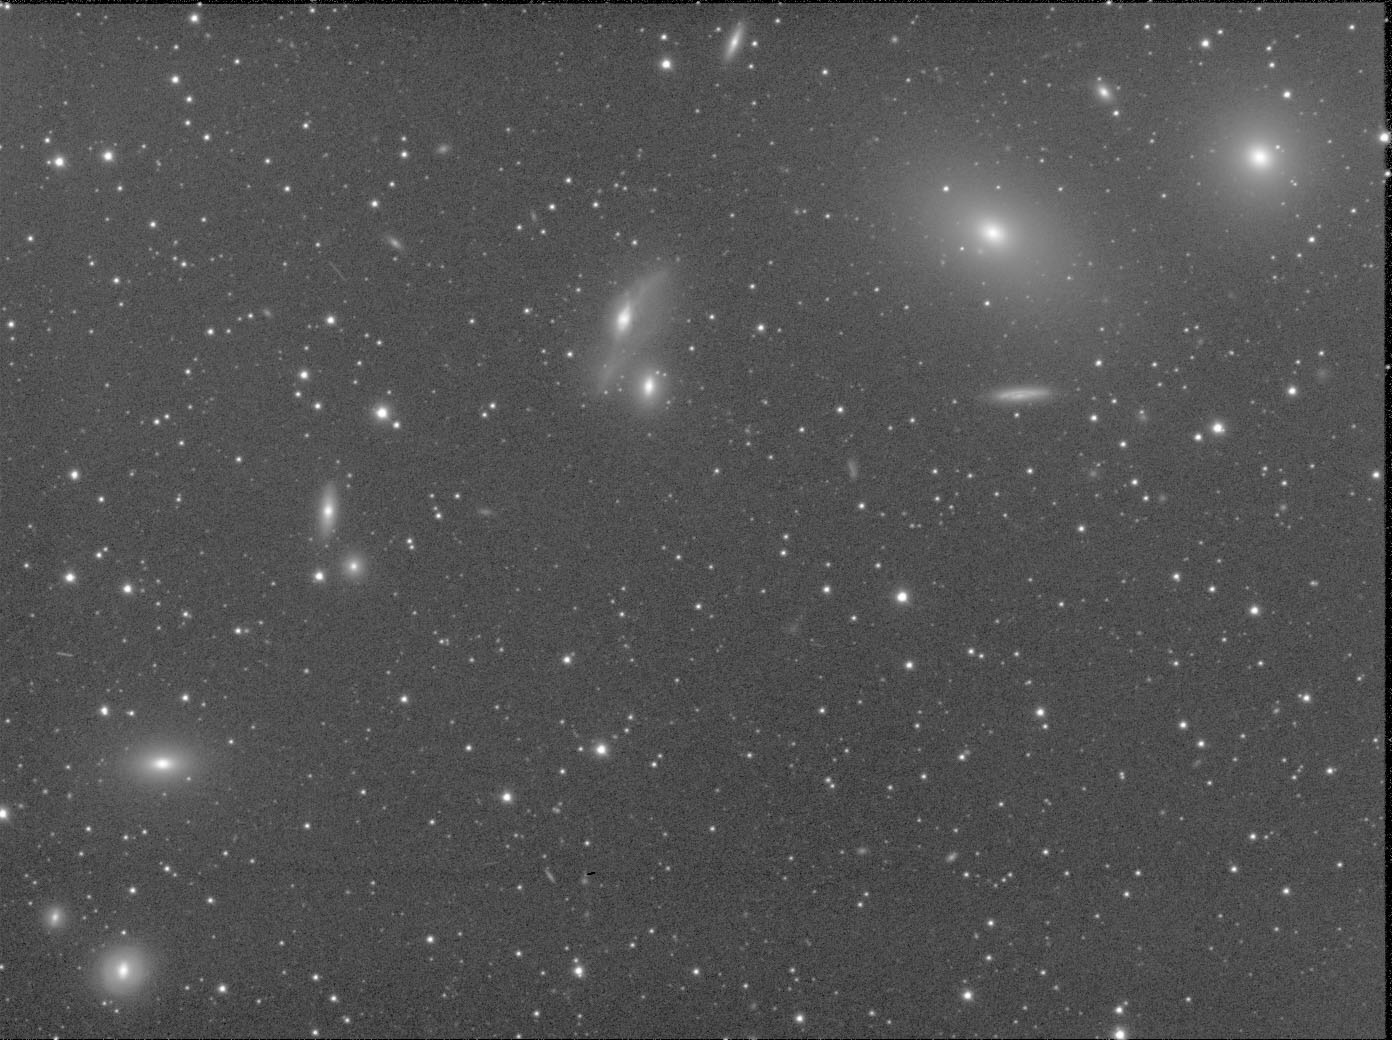 Here is the Markarian Chain after Sigmoid
Brightness Scaling. Note the dense scattering |
Copyright © 2008 by Richard Berry |
Return to Richard Berry's Home Page |
 Images from
high-quality CCD cameras often have a greater dynamic
range than a computer screen or hard copy can display.
Indeed, much of the effort that users expend when they
process astronomical images goes into techniques that
compress the dynamic range of the original into a
displayable range of brightness.
Images from
high-quality CCD cameras often have a greater dynamic
range than a computer screen or hard copy can display.
Indeed, much of the effort that users expend when they
process astronomical images goes into techniques that
compress the dynamic range of the original into a
displayable range of brightness.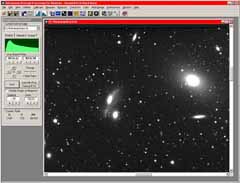 Experiment with the Black and White
parameters on the Image Display Control.
Experiment with the Black and White
parameters on the Image Display Control.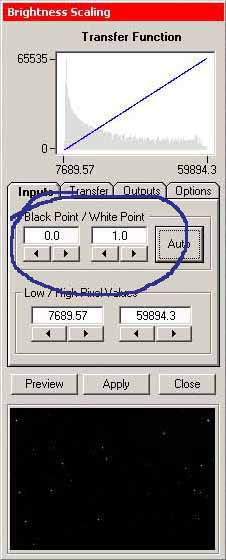 The Inputs tab
helps you select the range of pixels values in the image
that will be used in the new image you will create.
The Inputs tab
helps you select the range of pixels values in the image
that will be used in the new image you will create.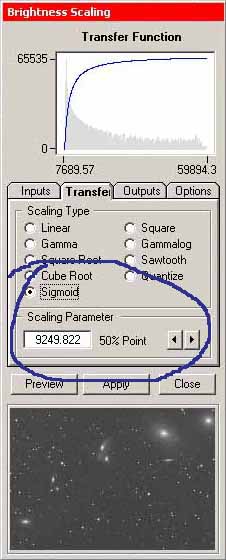 The Transfer tab
is used to choose how the current pixel values in the
image will be changed in the new enhanced image.
The Transfer tab
is used to choose how the current pixel values in the
image will be changed in the new enhanced image. The Outputs tab
sets the range of pixel values in the new enhanced image.
The Outputs tab
sets the range of pixel values in the new enhanced image.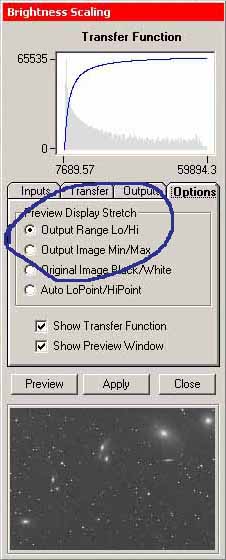 The Options tab
sets display options for the new enhanced image.
The Options tab
sets display options for the new enhanced image.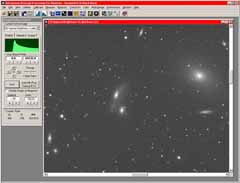 When you have set everything, do the
following:
When you have set everything, do the
following: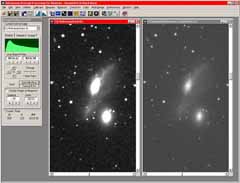 Compare the "before" and
"after images.
Compare the "before" and
"after images.