Cal Poly 18 Bulletin 11
2012-05-12: Attaining Control over the Machine
A whole week of clear nights means I've made rapid progress in chacterizing the behavior and performance of the Cal Poly 18. Of great importance was learning, from Don Westergren and Chuck Shaw, where to find the SiTech "Ops Manual." It turns out there are two SiTech sites: Dan Gray's SiTech where he has his hardware specs and software downloads: http://www.siderealtechnology.com/, and Jim Roe's site where Chuck has placed the reference software and manuals at http://www.sitechservo.info/Home. The Ops Manuals are at: http://www.sitechservo.info/controller-manual. Although the manuals are a bit out of date, but as Don notes, the fundamentals haven't changed. And the Release Notes for 0.90 document is a PDF on Dan's site with up-to-date info. The SiTech Ops Manual is a gold mine of information about the software that is hard to figure out using "by guess and by gosh" methods.
Initialization
Each night when I turned on the Cal Poly, I would click the "Home" button to open the initialize the altitude and azimuth encoders. This means the telescope slews until the home switches trip, and then it slowly creeps to the switches to determine the precise home positions. Doing this ties the current encoder count to the physical altitude and azimuth of the mounting. With the 'scope position calibrated, in theory the previously stored pointing model allows the user to acquire targets immediately. The problem was that this didn't work. When I tried to acquire Mars in the early evening, the telescope would consistently point about 10º below the only bright, convenient target, Mars. This forced me use the hand paddle to move to Mars, perform an Offset Init, anf then build a new pointing model.
Finally I had the "Duh..." moment! Dan and I set up the home position in March, but in April when we worked on the altitude motor, I had adjusted the strip of plastic that the optical switches see so that the telescope would not point past the zenith. This means that home position was likewise shifted...and that's why the telescope wouldn't point to Mars. So after making a new pointing model, I re-determined the transition angles (i.e., home positions). Normally, I would have had to wait to the next night to test whether the 'scope would initialize properly, but SiTech helpfully intervened by crashing. I initialized the telescope and landed smack on my first target. Lesson learned. Problem solved.
Mechanical Issues
I still don't quite understand the focuser and rotator. These devices have no home positions, so SiTech is supposed to save the current encoder counts and focus distance/rotation angle when you click the "Set Park" button. When the telescope initializes, assuming of course that neither has moved, these values are restored, and you proceed happily. However, it doens't seem to work that way. Instead, the focuser and rotator are initialized to 0 inches and 0º, respectively. This may be a bug in SiTech 90J, or it may be that I don't understand something. The obvious workaround is to drive the focuser to 0 inches and the rotator to 0 degrees before doing SetPark and Parking, then shutting down.
On the other hand, taking the time series images that follow demonstrated that the focuser allows exquisite control of the focus position, and the rotator follows the parallactic angle of the sky very nicely. If you have the "follow parallactic angle" chackbox checked, even when you slew from one object to another, the focuser rotates to keep north at top (which is just the way I want it). I am a bit leery of what will happen when the telescope crosses the meridian and the parallactic angle, which has been progressing from 10, to 9, to 8, etc., finally reaches 0.001º, then instantly becomes 359.999º. I assume this means the rotator will whip around 360º! I worry about snagging the motor and camera cables because this has already happened once. Luckily, the motor seems to have stalled and no damage to the wires or mechanically systems was done.
The other gotcha with tracking the parallactic angle is that the rotator and camera must be oriented (i.e., the physical zero angle of the rotator) so that north is at top when the logical angle of the rotator is zero. I determined the physical orientation where this occurs and marked the camera and rotator so they can be returned to their "zero" positions. All this is a bit preliminary; I will need to verify that it works the way I think it works by getting in-focus images with north at top.
Image Quality Issues
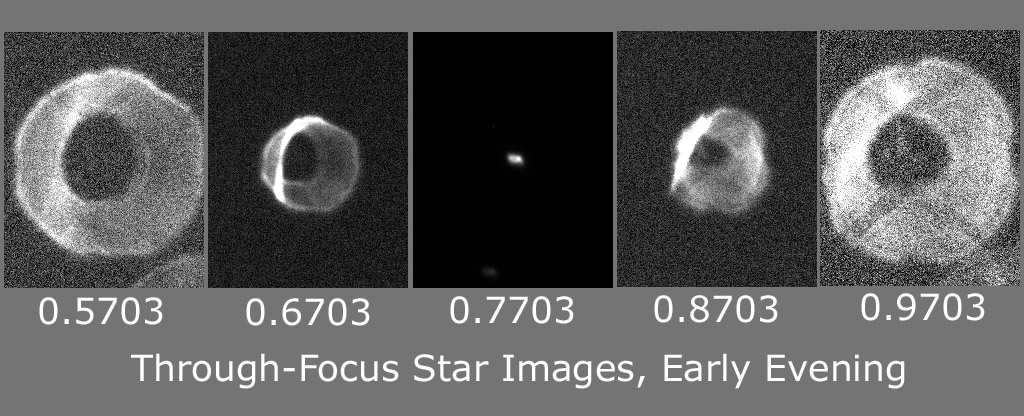
I've been bothered by "fat" and "coma-shaped" star images for quite a while, but the tests below point to thermal deformation of the mirror during cooling. In its present configuration, two 88mm high-volume muffin fans blow air from the top across the two-shell plate-glass mirror. I have suspected that as the air cools from its daytime temperture to that of night (i.e., from 25 C to perhaps 10 C), the fans cool the top side of the mirror more rapidly than the bottom.

The through-focus images show as asymmetric distortion in the early evening, but essentially round out-of-focus images later. The early evening image is specs are FWHM = 9.1 pixels, or approximately 13 pixels wide by 8 pixels high, which translates to 16 x 10 arcseconds. Fully cooled and round, FWHM = 5.45 pixels, or 7 arcseconds. The core of the image is smaller. I have not yet had a chance to examine the cooled images using an eyepiece.

These images are shown at 100% scale. Each box is 256 pixels high. Focus distances are in inches. The mirror profile is not round in part because the 0.016 polystyrene plastic light baffle intrudes slightly into the light path. So my working hypothesis is that he mirror becomes distorted because the fans do not cool the mirror uniformly, but cool the top side first. After a few hours, the entire mirror reaches the same temperature, and the mirror becomes rotationally symmetric.
Center of Field Rotation
Pointing models assume that the center of the camera image coincides with the pointing of the telescope, but this is not necessarily true with a field rotator. If the camera rotates around a point that is not the field center, then we think the model will be messed up. So the pointing model is made with the camera stationary, and when the camera rotates, targets are displaced from their expected location at the field center. The image below shows the camera rotated and stopped briefly at to 0º, 90º, 180º, 270º, and 350º camera angle during a 60-second exposure.
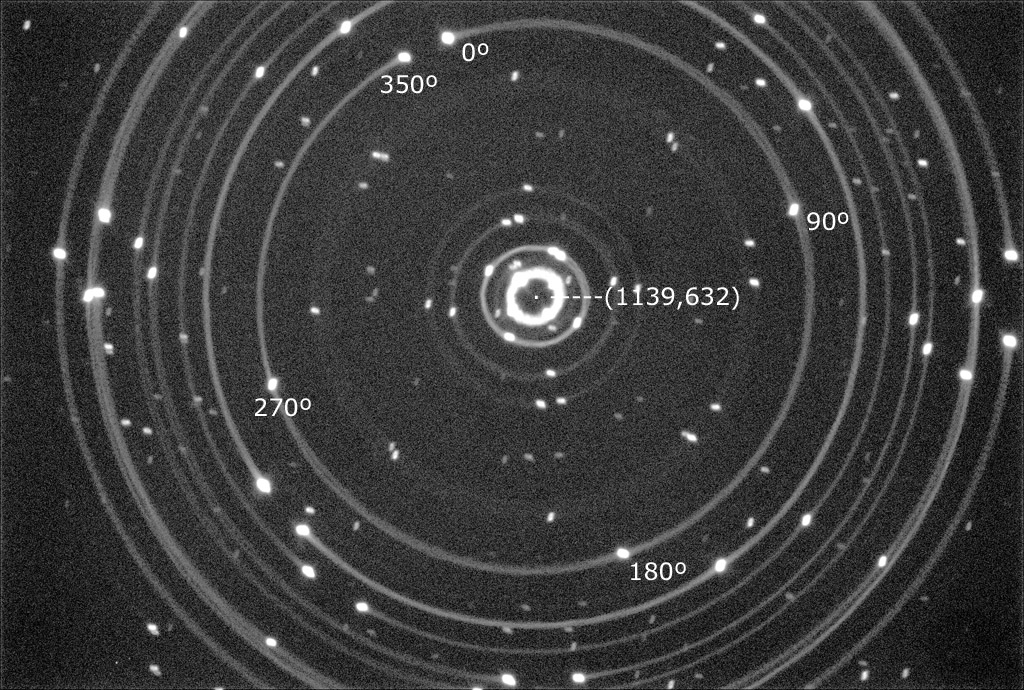
It should not be too difficult to center the camera so the image center coincides with the axis of rotation.
May 9, 2012: First Science Run!
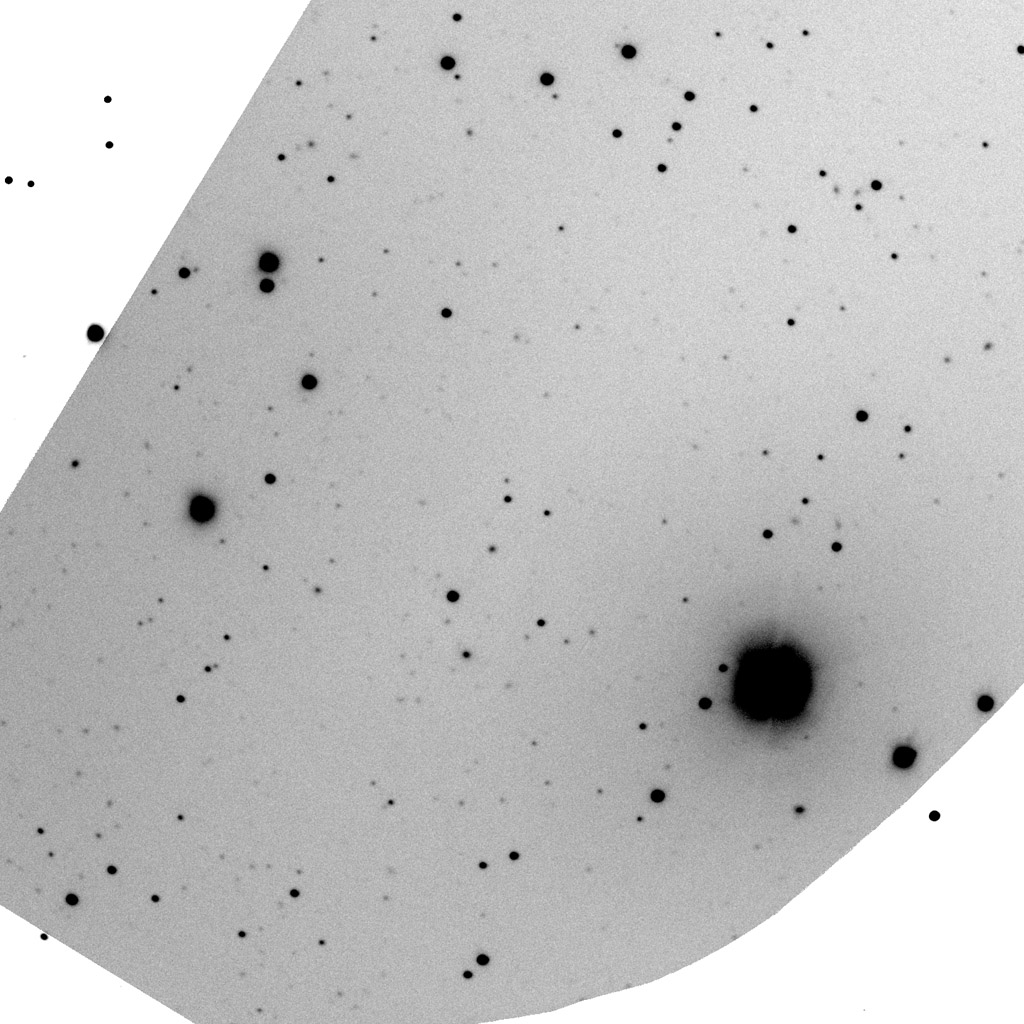
Did a 29-star pointing model with 5 arcsec r.m.s. pointing error. To kill time until CR Boo rose over the trees, made two dismal images of Leo I and Leo II dwarf galaxies (very faint) with 300-second exposures. At ~10:20 pm began a time-series run on CR Boo that ran until ~3:00 am. Sometime during the run, the cables got wrapped, so the rotator could not follow the parallactic angle of the field. Took 220 images with 60-second exposures through a Tricolor Red filter. The stacked result is below. The images is presented as a negative so you can see faint things better. Note that star images look perfectly round, but there are many slightly soft non-round objects in the field. These are galaxies, and when you go faint, they outnumber the stars. The bottom edge of the image is rounded because on an alt-azimuth telescope, the apparent field of view rotates unless you rotate the camera to counteract it.
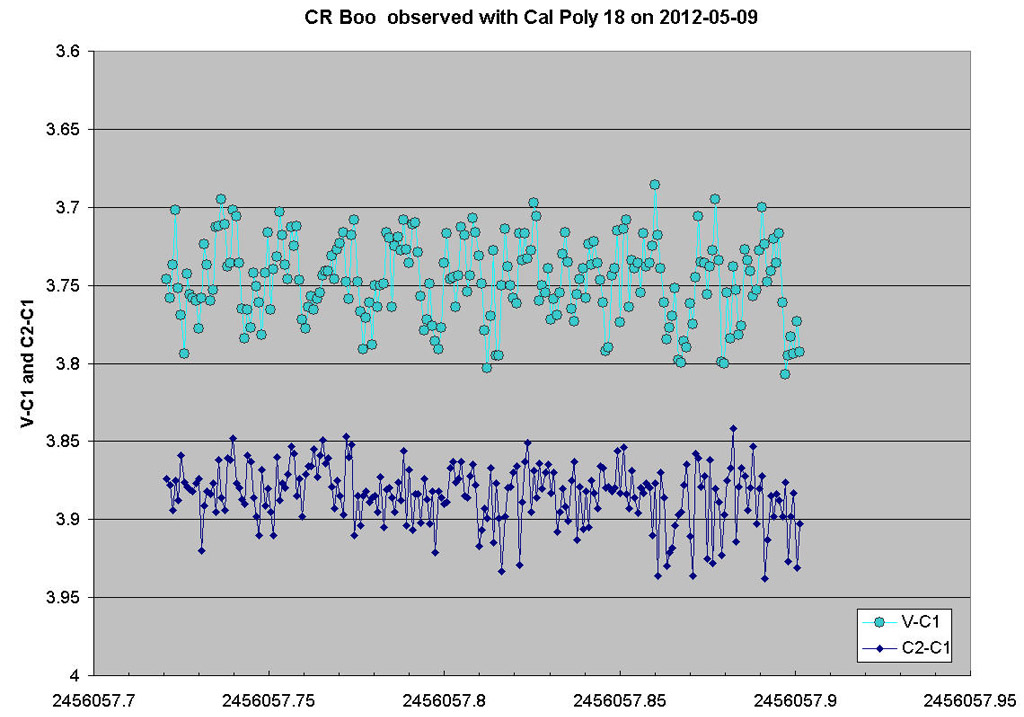
Below is differential photometry of CR Boo (teal circles) and another faint (R~15.0) star (blue diamonds) in the image. Both light curves look like random noise, but you will notice that CR Boo appears noisier than the 15.0 star. Photon statistics decree the reverse should occur. What we're looking at is flickering by cataclysmic variable CR Boo around 14.75 magnitude (=TR). The noise in the 15.0 star is photon statistics noise with an r.m.s. amplitude of about 0.02 mags. Both show a bit of trend because the C1 comp star is deep red, so its atmospheric extinction differs from that of CR Boo and the 15.0 star, and also possibly because the seeing and focus deteriorated during the unattended ~4.5-hour run (I went to bed).
Pictures from Tracking Tests
The following pictures were taken while conducting pointing, tracking, focusing, and rotating tests. After all, you need to point the telescope at something while you are doing these.

I made the color image of NGC 4565 above by shooting what I hoped would be 12 images each through red, green, and blue filters. During the series, the telescope would cross the meridian and the rotator would presumably do a 360º spin. As the parallactic angle approached zero, SiTech crashed! It's possible a divide-by-zero error caused the crash, or maybe it was just coincidence. In any case, MaximDL remained open but frozen, and Win 7's Task Manager could not kill the process. Ultimately, I had to reboot the computer and restart everything, but (O Joy!) after homing, the telescope slewed right back to NGC4565, with the correct angular orientation! I continue with few more images, but SiTech crashed again. I could not re-establish communication with the focuser/rotator, and the QSI camera generated a #31400 camera error. I shut down for the night.
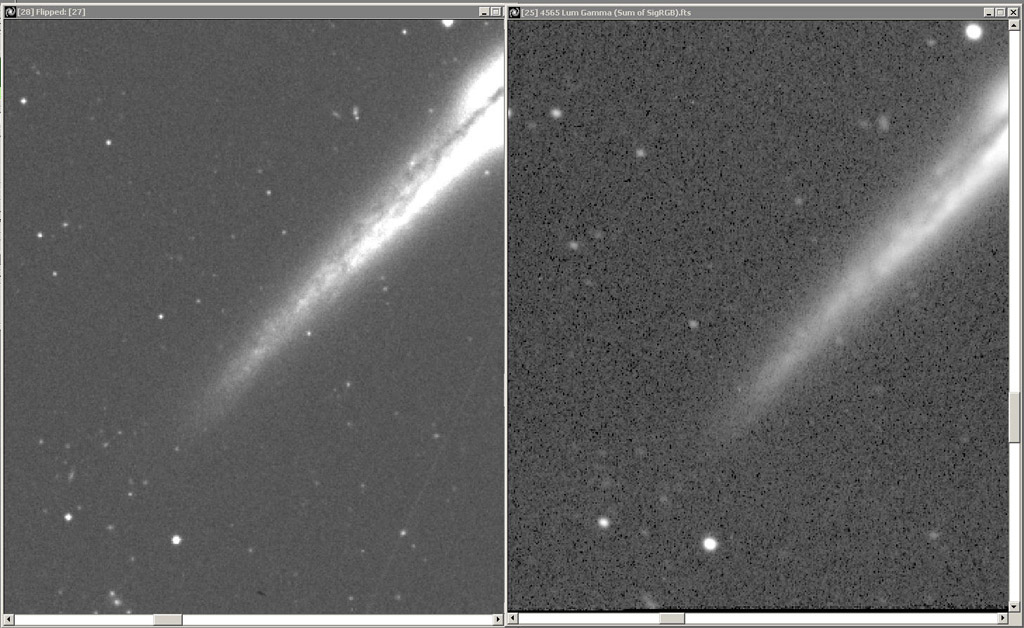
I'll conclude NGC4565 with a comparion between the Digital Sky Survey (left) and the Cal Poly (right). Off the tip of the arm plane you see a faint, distant cluster of galaxies in both images. The POSS/DSS image is deeper and has better spatial resolution, but the Cal Poly picks up images of many faint galaxies that you might not think real if you did not have the DSS comparison.
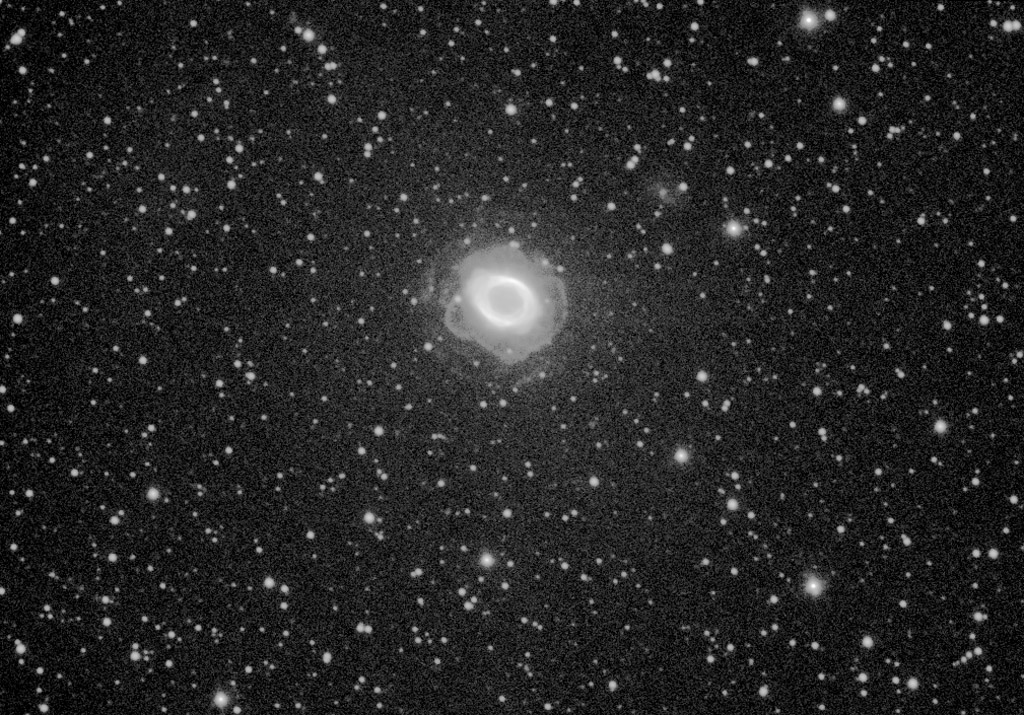
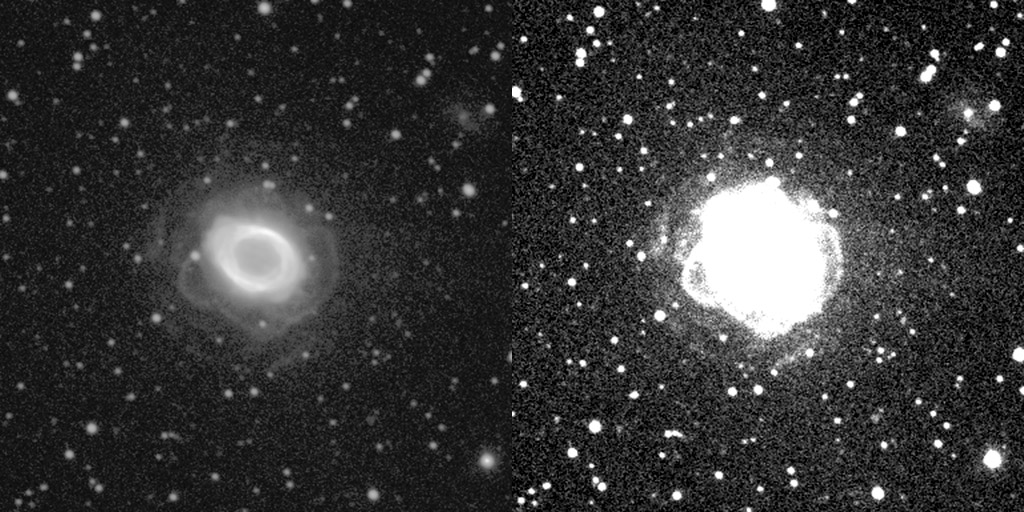
These are H-alpha images of M57. They are made from 32 exposures each 120-seconds binned 2x2. Everything worked beautifully during this run. The image is very deep, showing the usual view of M57, plus a petal-like outer shell and a fainter, wispier outer-outer sheel. Before blowing off the familiar planetary shell we see, the central star had apparently burped several earlier times.
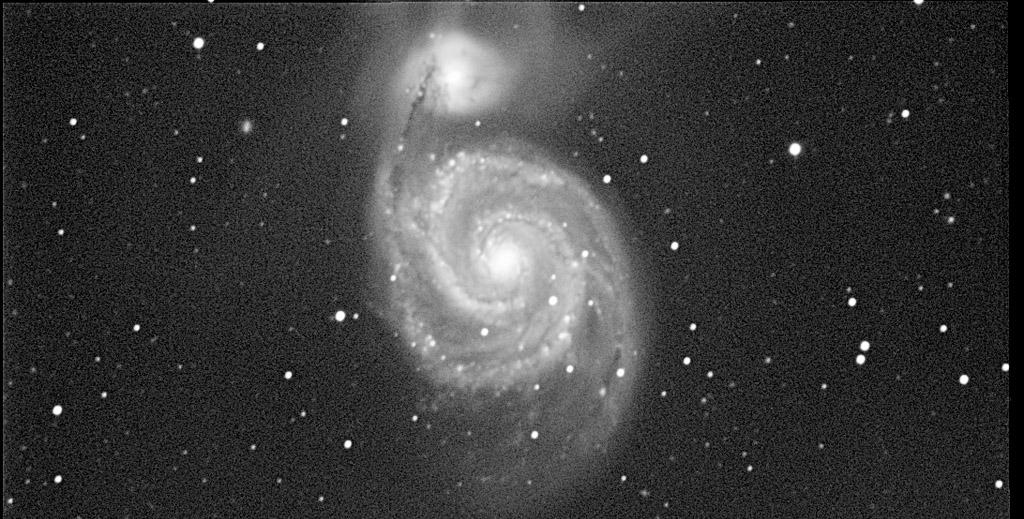
Because M51 passes very close to the zenith at my place, it's a great test for an alt-az telescope with a camera rotator. I set up the run to take 32 exposures of 120 seconds each in red, green, and blue, but messed up the scripting so all images were taken in red. As M51 approached the zenith, the parallactic rate grew rapidly. I don't know what happened exactly, but I think the telescope stopped tracking either because it entered the "forbidden azimuth zone" between 350º and 10º, or it exceeded the maximum altitude of ~89º. The azimuth limitation occurs because the azimuth encoder has a gap 20º wide; that in altitude because the limit switch prevents going any farther.

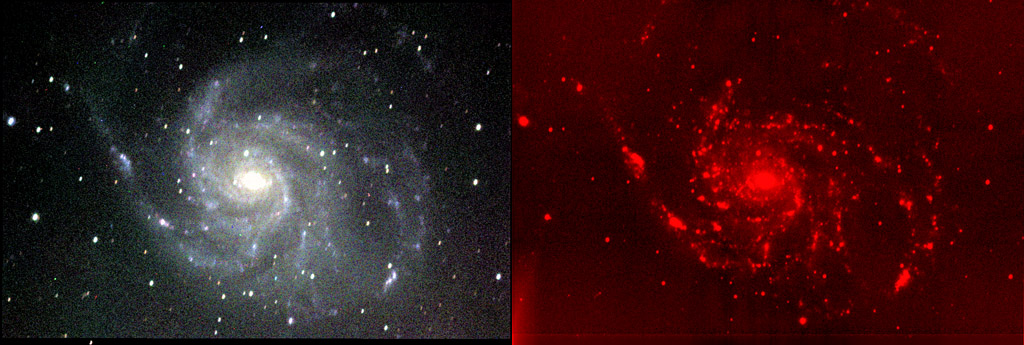
M101 also passes near the zenith, so a made a run 32 exposures of 120 second each binned 2x2. The first six exposures were messed up because I determined the focus difference between the red filter (0.7440 inches) and the H-alpha filter (0.7606 inches). This means a can focus the Ha filter by focusing for the red filter and adding 0.0166 to the red focus position. To focus the Ha filter, I used a bright star (Mizar), but it was so bright in the red filter that an RBI (residual bulk image) ghost of Mizer appeared in the first six images of M101 in Ha. In the top image I overlaid a luminance image with the Ha image. The HII regions in M101 neatly map the spiral arms. The lower pair of images show a color image beside the Ha image.
Note the poor tracking. After the computer crash, I made a pointing model using SiTech's 16-star default, and three of the fields weren't solved, so I had a 13-star model that wasn't very good.
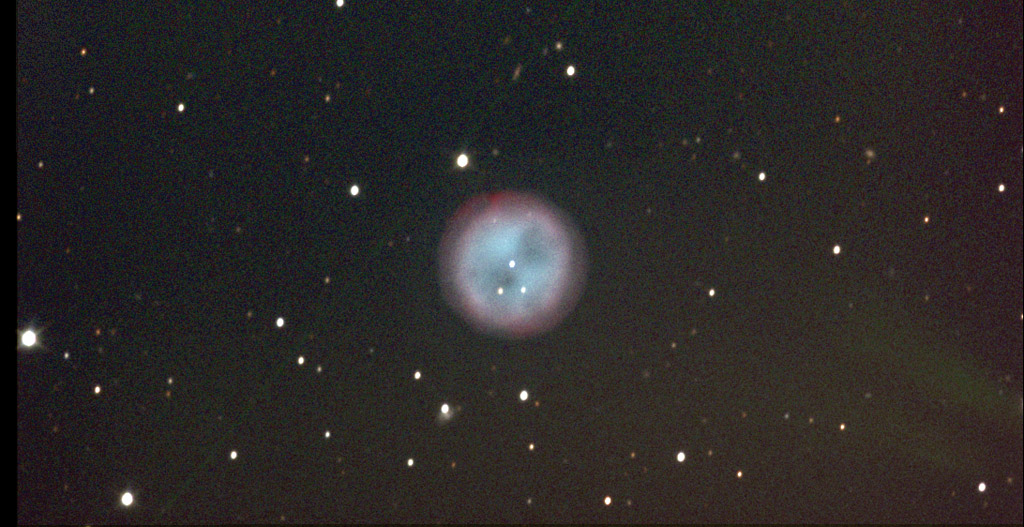
Finally, a nice picture of M97, the Owl Nebula. Despite rather poor tracking...that crummy 13-star model again...the series had 10 good red images, 9 good green images, and 9 good blue images.
This is Cal Poly Bulletin 11
Main CalPoly Bulletin page or go back to Bulletin 10
Return to Richard Berry's Home Page